You Might Also Like:
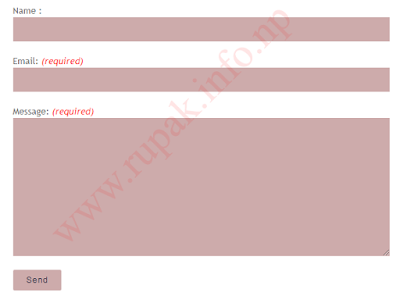
Blogger has its own contact form widget for the blog owner to receive the message from the visitor. Adding Contact Form Widget is very simple (Add Contact Form Widget Tutorials) and it has no specific location for contact. So, here we are going to describe How to Create Contact Page on Blogger with the best design. Every blog or site need the contact page to make an easy way to contact site or blog owner.


How to Create Contact Page on Blogger?
Here are simple steps to create contact page on blogger.
1. Login to Blogger Dashboard and choose your blog to add the contact page.
2. Go to Pages > New Page

3. Give page name (Title) as Contact Us or Contact or Contact Me as you like.
4. Choose HTML form Compose/HTML.
1. Login to Blogger Dashboard and choose your blog to add the contact page.
2. Go to Pages > New Page

3. Give page name (Title) as Contact Us or Contact or Contact Me as you like.
4. Choose HTML form Compose/HTML.
- How to add sitemap page on Blogger?
- Add Blog Comment Policy Above Comment Box.
- Yoast SEO on Blogspot Blog Post.
More Stuff:
<script>
var blogId = 'BlogID';
var contactFormMessageSendingMsg ='Sending...';
var contactFormMessageSentMsg = 'Your message has been sent.';
var contactFormMessageNotSentMsg = 'Message could not be sent. Please try again later.';
var contactFormEmptyMessageMsg ='Message field cannot be empty.';
var contactFormInvalidEmailMsg = 'A valid email is required.'

var widgetLoaded=false;
function sendEmailMsg() {
if(widgetLoaded== false) {
_WidgetManager._RegisterWidget('_ContactFormView', new _WidgetInfo('ContactForm1', 'sidebar', null, document.getElementById('ContactForm1'), {'contactFormMessageSendingMsg': contactFormMessageSendingMsg , 'contactFormMessageSentMsg': contactFormMessageSentMsg , 'contactFormMessageNotSentMsg': contactFormMessageNotSentMsg , 'contactFormInvalidEmailMsg': contactFormInvalidEmailMsg , 'contactFormEmptyMessageMsg': contactFormEmptyMessageMsg , 'title': 'Contact Form', 'blogId': blogId, 'contactFormNameMsg': 'Name', 'contactFormEmailMsg': 'Email', 'contactFormMessageMsg': 'Message', 'contactFormSendMsg': 'Send', 'submitUrl': 'https://www.blogger.com/contact-form.do'}, 'displayModeFull'));
widgetLoaded=true;
document.getElementById('ContactForm1_contact-form-submit').click();
}
return true;
}
</script>
 <form name='contact-form'>
<div>Name : </div>
<input class='contact-form-name' id='ContactForm1_contact-form-name' name='name' size='30' type='text' value=''/>
<div>Email: <em>(required)</em></div>
<input class='contact-form-email' id='ContactForm1_contact-form-email' name='email' size='30' type='text' value=''/>
<div>Message: <em>(required)</em></div>
<textarea class='contact-form-email-message' id='ContactForm1_contact-form-email-message' name='email-message' rows='5'></textarea>
<p></p>
<input class='contact-form-button contact-form-button-submit' id='ContactForm1_contact-form-submit' type='button' value='Send' onclick="sendEmailMsg()"/>
<div style='text-align: center; max-width: 450px; width: 100%'>
<p class='contact-form-error-message' id='ContactForm1_contact-form-error-message'></p>
<p class='contact-form-success-message' id='ContactForm1_contact-form-success-message'></p>
</div>
</form>

<style type="text/css">
.contact-form-widget{margin-left:auto;margin-right:auto;width:600px;max-width:100%;padding:40px 0}.contactf-name,.contactf-email{float:left;width:48.25%}.contactf-name{margin-right:3.5%}.contact-form-name,.contact-form-email,.contact-form-email-message,.contact-form-name:hover,.contact-form-name:focus,.contact-form-email:hover,.contact-form-email:focus,.contact-form-email-message:hover,.contact-form-email-message:focus{width:100%;max-width:100%;margin:0 0 20px;padding:10px 15px;font-size:12px;letter-spacing:1px;color:#444;background:#F3F3F3;border:medium none;-webkit-box-shadow:none;-moz-box-shadow:none;box-shadow:none}.contact-form-name,.contact-form-email{height:37px}.contact-form-email-message{height:170px}.contact-form-button-submit,.contact-form-button-submit:hover{width:13%;height:30px;font:normal 12px Arial;letter-spacing:1px;color:#444;display:block;outline:none;margin-bottom:20px;text-align:center;background:#E6E6E6;border:0;cursor:pointer}.contact-form-button-submit:active{outline:none;-webkit-box-shadow:none;box-shadow:none}.contact-form-cross{border:medium none!important;box-shadow:none!important;padding:0!important}
</style>
6. Customization:
Replace BlogID with your own Blog ID (How to know Blog ID?)
7. Publish your page and check it.
This is one of the very simple methods to create contact page on blogger. You can customize these fields as your own coding knowledge. Best of luck :)
Comments deemed to be spam or questionable spam, including profanity and containing language or concepts that could be deemed offensive will be deleted. Only comments that are relavent to the post topic will be published.


